People often ask me,
“What’s your blog powered by? It looks nothing like WordPress!”
And that, my friends, is the power of customizing your WordPress blog.
Downloading a theme from the WP gallery or buying a theme is not enough.
If you do not customize your blog design beyond installing and slightly customizing it, you will not end up with a blog that stands out from other blogs.
So many food blogs use Mediavine’s Trellis theme; they all look and feel the same.
Look at the examples of using the Feast plugin with Kadence themes, and tell me these are not like the Leda clones in Orphan Black:

Many bloggers stop at the simple setup and think, “This is good soup.”
A standard theme doesn’t change how helpful your content is, but it can directly affect your visibility because it looks too similar.
WordPress has become so widespread that it’s safe to assume a blog you land on is built with it.
But when someone knows it’s WP because the theme is the same as all other WP blogs they’ve seen — with only slight differences — you have a branding problem.
And it’s showing up in your design.
This is how I customize my own WordPress blogs.
Custom 404 page
This customization requires more technical know-how to implement, but is worth it.
Most themes copy-and-paste the page.php template as the 404, with some edits so you have a search form and maybe the most recent posts. Some do not even bother.
Custom-designed themes rarely have this anymore, as web designers and developers opt for quick turnaround.
That’s why customizing the 404 page is special.
My 404 page is where I’m unapologetically punny and/or snarky. More blunt than I might be in a blog post, ’cause few are gonna see it. Great place for Easter eggs!
Customized Classic Visual Editor
Did you know you can customize the font and other styling in your WordPress Visual Editor?
Ever since I learned, I can’t go back. 😅 It HAS to be part of every theme I have, on every blog.
Custom Visual Editor styles help set the mood so I can write new blog posts in WordPress.
The default font in the WP Visual Editor is serif, which I struggle to read and get migraines from due to the font’s feet.
This customization doesn’t affect the frontend of your blog, but it can help you be more mindful of your blog’s design. The default Classic Visual Editor feels like a clinical afterthought.
Backend access required
This tutorial is incompatible with WordPress.com-based hosting.
If you don’t know what cPanel or FTP is, you most likely lack access.
Some managed WordPress hosting options still provide a cPanel, but most do not.
These kinds of hosting options tend to turn off the ability to directly edit theme and plugin files, too, or else I’d provide you with a plugin to add in your own editor styles.
Customizing the CSS
Create visual-editor.css, and put it into your theme’s directory.
You can add pretty much whatever you want.
I like to style the margins to have white space, so my writing can breathe. I customize my Visual Editor to look as close to my blog’s theme as possible to give me a good idea of how it might look when published.
If you make changes later, you might need to clear your cache or the name of the file to be able to see your changes.
Editing the functions.php file
To let WordPress know to call the style sheet, you’ll need to add the following to functions.php:
// custom visual editor
function visual_editor_style($url) {
	if ( !empty($url) )
		$url .= ',';
	// Change the path here if using sub-directory
	$url .= trailingslashit( get_stylesheet_directory_uri() ) . 'visual-editor.css';
	return $url;
}
add_filter('mce_css', 'visual_editor_style');
If you’ve changed visual-editor.css to something else, or put it into a sub-directory, you’ll need to change the strong/bold text in the snippet above accordingly.
And that’s it!
Custom login styling
If you don’t have technical know-how or want a quick setup, a plugin like LoginPress gives you that.
Otherwise, you need backend access where you can add and edit files.

Snippets for functions.php
There are 3 snippets for the functions.php file in your WP theme.
	// custom WP login begin
// implement your custom styles
function my_login_css() {
	wp_enqueue_style( 'custom-login', get_stylesheet_directory_uri() . '/custom-login.css' );
}
add_action( 'login_enqueue_scripts', 'my_login_css' );
// change URL from wordpress.org to your blog's index page
function my_login_logo_url() {
	return get_bloginfo( 'url' );
}
add_filter( 'login_headerurl', 'my_login_logo_url' );
// change logo link hover title to your blog name
function my_login_logo_url_title() {
	return 'Your Blog Name';
}
add_filter( 'login_headertitle', 'my_login_logo_url_title' );
	// custom WP login end
Stylizing the login page
You’ll need to create a file named custom-login.css in your current WP theme’s folder.
These are all the specific CSS selectors:
body.login {}
body.login div#login {}
body.login div#login h1 {}
body.login div#login h1 a {} // logo as background image
body.login div#login form#loginform {}
body.login div#login form#loginform p {}
body.login div#login form#loginform p label {}
body.login div#login form#loginform input {}
body.login div#login form#loginform input#user_login {}
body.login div#login form#loginform input#user_pass {}
body.login div#login form#loginform p.forgetmenot {}
body.login div#login form#loginform p.forgetmenot input#rememberme {}
body.login div#login form#loginform p.submit {}
body.login div#login form#loginform p.submit input#wp-submit {}
body.login div#login p#nav {}
body.login div#login p#nav a {}
body.login div#login p#backtoblog {}
body.login div#login p#backtoblog a {}
Since the logo links back to my homepage, I chose to hide the “Back to blog” link using display:none for the p#backtoblog selector.
I like my p#nav with opacity:.8 because I don’t need links below the form to stand out.
You can find more ways to customize the WP login page on the Codex.
Distinctive color palette
I look at blogs in their respective industries, as well as what products I may promote through affiliate marketing on a blog.
This helps me determine what colors may be (un)common or (un)expected.
Lemon & Lively’s colors are coincidentally the same colors as the newer lesbian pride flag.
What started out blue and pink (unintentionally trans pride flag colors) added a few orange hex codes because I wanted more color that
- still complemented my photos (like using a lot of green)
- looked good in dark mode
I use the 60-30-10 color rule for interior design on my blogs, even if their branding includes multiple colors. Pink and orange look really similar to me, so sometimes I could them as one.
External link differentiation
WP External Links by WebFactory adds an icon to the end of external links so my seeing readers know when they’re clicking an external link.
I could add a link class to external links myself, but not to every single external link on my blog.
With the plugin, I could even exclude certain domains from having external link icons, e.g.:
- jane.fyi
- JaneLively.co
- JaneLively.com
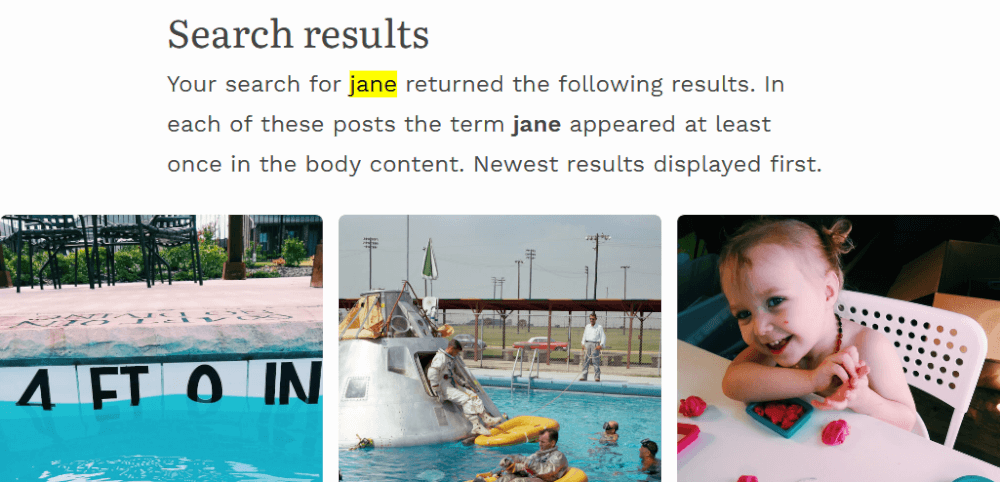
Tweak WP’s search algorithm
Your WP blog has its own search engine.
The site search feature on the frontend lets anyone with access input their search queries and find content that matches.
By default, WP does not show images, only pages and posts.
But you can customize it to enhance your visitors’ experience!
If the search returns 1 post, redirect to that post
Save your reader time by reducing the number of clicks to their destination!
This also works for pages, unless you omit them from search results.
// Redirect visitor to post/page if it is the only search result || sauce: https://www.paulund.co.uk/redirect-search-results-return-one-post

add_action('template_redirect', 'redirect_single_post');
function redirect_single_post() {
	if (is_search()) {
		global $wp_query;
			if ($wp_query->post_count == 1 && $wp_query->max_num_pages == 1) {
				wp_redirect( get_permalink( $wp_query->posts['0']->ID ) );
				exit;
			}
		}
}
Omit pages from search results
This one is tricky, because the function will also affect your search experience in the dashboard — you won’t be able to search for your pages!
If you omit pages from your search results, you will need to add images to search results to be able to search them in your WP Dashboard.
I used this function years ago, but don’t anymore.
// Only posts show in search results
	function filter_search($query) {
	if ($query->is_search) {
		$query->set('post_type', 'post');
	}
	return $query;
	}
	add_filter('pre_get_posts', 'filter_search');
Add images to search results
// Only posts show in search results
		function filter_search($query) {
		if ($query->is_search) {
			$query->set('post_type', array( 'post', 'attachment'));
		}
		return $query;
		}
		add_filter('pre_get_posts', 'filter_search');
To keep images from appearing on their own, and to deter spam, I created image.php in my current theme’s folder and filled it with this:
<?php wp_redirect(get_permalink($post->post_parent)); ?>
This function redirects direct image URLs — which is helpful in the event of someone clicking to view the image page from Google — to the posts they are attached to.
If unattached, the permalink results in a redirection issue. This isn’t an issue for me personally, as I don’t deliberately link to my images.
Plugins that alter WP search functionality
Two nifty plugins I like using are Search Exclude by quadlayers and Media Library Assistant by David Lingren.
Search Exclude lets you exclude specific posts, pages, categories, etc. from your WP site’s search results.
It’s useful for hiding secret pages that you don’t even let Google index, like a special discount page for people who find the link from reading your blog/being curious or thank-you pages for subscription forms.
Media Library Assistant is more complex, mainly for WP users wanting to organize their WP Media Library beyond the basic functionality.
This plugin lets me tag images, which makes searching easier. The functionality could be added to your public-facing WP search; I chose not to for mine.
Love this post?
Support me by subscribing to my blog and/or buying me a cuppa:
Leave a comment